Like Us Like Us Facebook Subscribe Subscribe us YouTube Whatsapp Share us Whatsapp Query Send your queries

PHP Image upload , Saving link to Database complete tutorial

PHP Image upload , Saving link to Database complete tutorial

This blog is dedicated to all our visitors who asked me to publish a working tutorial on  image upload  using PHP and Saving its path to Mysql Table.

PHP Image upload , Saving link to Database

How to do that :
First we will create a file called install.php , it will create a database called
myimages and a table  named imgtables and also create a folder called gallery where we are going to store  images.

Create a file name install.php
——————————————————

<?php
/*
file name : Install.php
purpose : creating a database name myimages
and table imgtables
Create by : Sanjay Prasad
[email protected]
http://www.openplus.in
*/$db=mysqli_connect(“localhost”,”root”,””);

if($db->connect_errno){
echo “Error <br/>”.$sp->error;
}

$query=”create database if not exists myimages”;

if($db->query($query)){
echo “Created database myimages ..<br/>”;

$sp=mysqli_connect(“localhost”,”root”,””,”myimages”);
if($sp->connect_errno){
echo “Error <br/>”.$sp->error;
}

$tbquery=”create table if not exists imgtables(
id int unsigned auto_increment primary key,
imgurl varchar(255),
date varchar(100)

)engine=’InnoDB'”;

if($sp->query($tbquery)){
echo “Table imgtables created Successfully  ..<br/> “;
}else{
echo “Error <br/>”.$sp->error;
}

//creating directory gallery

if(mkdir(“gallery”,0777)){
echo “Folder gallery create successfully”;
}else{
echo “Error Creating Directory”;
}

}
else{
echo “Error <br/>”.$sp->error;
}

?>

Now We have to create a file name gallery.php, which will upload images to folder gallery and saved their name like flower.jpg on table filed imgurl.

gallery.php

<!DOCTYPE html>
<html lang=”en”>
<head>
<title>File Uploading</title>
<meta charset=”utf-8″ />
</head><body>
<?php
$sp=mysqli_connect(“localhost”,”root”,””,”myimages”);
if($sp->connect_errno){
echo “Error <br/>”.$sp->error;
}$path=”gallery/”;

if(isset($_POST[‘upload’]))
{

$path=$path.$_FILES[‘file_upload’][‘name’];

if(move_uploaded_file($_FILES[‘file_upload’][‘tmp_name’],$path))
{
echo ” “.basename($_FILES[‘file_upload’][‘name’]).” has been uploaded<br/>”;
echo ‘<img src=”gallery/’.$_FILES[‘file_upload’][‘name’].'” width=”48″ height=”48″/>’;
$img=$_FILES[‘file_upload’][‘name’];
$query=”insert into imgtables (imgurl,date) values(‘$img’,now())”;
if($sp->query($query)){
echo “<br/>Inserted to DB also”;
}else{
echo “Error <br/>”.$sp->error;
}

}
else
{
echo “There is an error,please retry or ckeck path”;
}
}
?>
<form action=”gallery.php” method=”post” enctype=”multipart/form-data”>
<table width=”384″ border=”1″ align=”center”>
<tr>
<td width=”108″>Select File</td>
<td width=”260″><label>
<input type=”file” name=”file_upload”>
</label></td>
</tr>
<tr>
<td><label>
<input type=”submit” name=”upload” value=”Upload File”>
</label></td>
<td>&nbsp;</td>
</tr>
</table>
</form>
</body></html>


My way learn MySQLI and PHP by examples

My way learn MySQLI and PHP by examples

MySQL is world most used database and when its works PHP then they have no match. Learning MySQL is very is one can found thousand of tutorial on net but these are now old as MySQLI(or MySQL Advanced) next version are now on demand as implementation is easy, secure and little bit faster. In this tutorial I am going to share Uses of MySQli in your next project.

MySQLI and PHP by examples

For Connecting to database, create a PHP file name dbsettings.php with following code :
[php]
$sanjay=new mysqli(‘localhost’,’root’,”,’mysqlifirst’);
if($sanjay->connect_errno){
echo $sanjay->connect_error;
}
[/php]
I think above line is quite easy to understand, mysqlifirst is the name of your database.

Data query :
Suppose you have a table name billings which has coloumn trans_id, amount and so on.
Create a another file name dataquery.php with following code:

[php]
require(‘dbsettings.php’);
$query=”select * from billings where trans_id=’2013′ “;
$sendq=$sanjay->query($query);
$rows=$sendq->fetch_assoc();
echo “Transaction ID. 2013 amount is Rs.”.$rows[‘amount’];
[/php]
This is I think a very simple example of using MySqli. If you have any doubt then comment below , I will try to explain it later.
+Sanjay Prasad

Upload user profile image and save to data base -PHP MYSQLI

Upload user profile image and save to data base -PHP MYSQLI

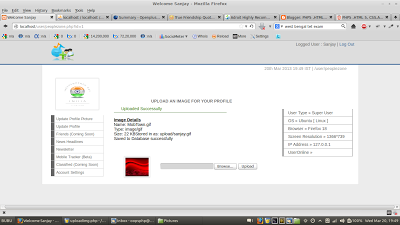
 If you are working on customized CMS or Social networking website then user profile image may be or may not be a head ache I have developed my own where we can upload and rename the image username.jpg/png/gif with size restriction to 200KB.

PHP MYSQLI Upload Image Tutorial

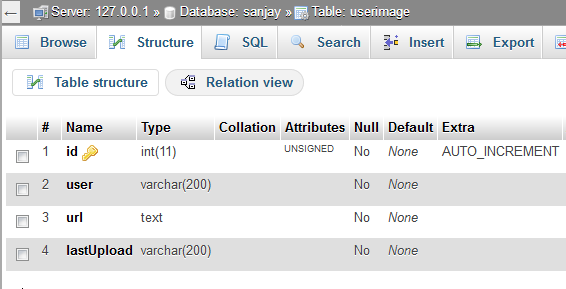
First design a table where database name is Sanjay.
Create a table userImage  fileds
user – username will be stored
url – url of img stored
lastUpload- when the upload was done.
Create a folder upload/   where  all images will stored.

[php]
<?php
$user=”sanjay”; //you can fetch username here
$db=new mysqli(‘localhost’,’root’,”,’Sanjay’);
if($db->connect_errno){
echo $db->connect_error;
}
$pull=”select * from userImage where user=’$user'”;
$allowedExts = array(“jpg”, “jpeg”, “gif”, “png”,”JPG”);
$extension = @end(explode(“.”, $_FILES[“file”][“name”]));
if(isset($_POST[‘pupload’])){
if ((($_FILES[“file”][“type”] == “image/gif”)
|| ($_FILES[“file”][“type”] == “image/jpeg”)
|| ($_FILES[“file”][“type”] == “image/JPG”)
|| ($_FILES[“file”][“type”] == “image/png”)
|| ($_FILES[“file”][“type”] == “image/pjpeg”))
&& ($_FILES[“file”][“size”] < 200000)
&& in_array($extension, $allowedExts))
{
if ($_FILES[“file”][“error”] > 0)
{
echo “Return Code: ” . $_FILES[“file”][“error”] . “<br>”;
}
else
{
echo ‘<div class=”plus”>’;
echo “Uploaded Successully”;
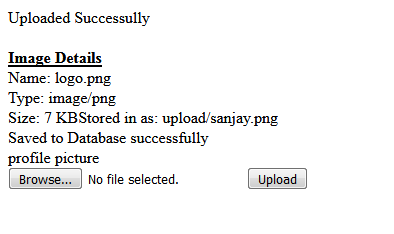
echo ‘</div>’;echo”<br/><b><u>Image Details</u></b><br/>”;

echo “Name: ” . $_FILES[“file”][“name”] . “<br/>”;
echo “Type: ” . $_FILES[“file”][“type”] . “<br/>”;
echo “Size: ” . ceil(($_FILES[“file”][“size”] / 1024)) . ” KB”;

if (file_exists(“upload/” . $_FILES[“file”][“name”]))
{
unlink(“upload/” . $_FILES[“file”][“name”]);
}
else{
$pic=$_FILES[“file”][“name”];
$conv=explode(“.”,$pic);
$ext=$conv[‘1′];
move_uploaded_file($_FILES[“file”][“tmp_name”],”upload/”. $user.”.”.$ext);
echo “Stored in as: ” . “upload/”.$user.”.”.$ext;
$url=$user.”.”.$ext;

$query=”update userImage set url=’$url’, lastUpload=now() where user=’$user'”;
if($upl=$db->query($query)){
echo “<br/>Saved to Database successfully”;
}
}
}
}else{
echo “File Size Limit Crossed 200 KB Use Picture Size less than 200 KB”;
}
}
?>
<form action=”” method=”post” enctype=”multipart/form-data”>
<?php
$res=$db->query($pull);
$pics=$res->fetch_assoc();
echo ‘<div class=”imgLow”>’;
echo “<img src=’upload/$pics[url]’ alt=’profile picture’ width=’80 height=’64’ class=’doubleborder’/></div>”;
?>
<input type=”file” name=”file” />
<input type=”submit” name=”pupload” class=”button” value=”Upload”/>
</form>
[/php]

Hope You will understand this simple script.

Tutorial is update on 31 May 2017, working fine tested on  XAMPP Version 7.0.8

if you want complete script with foundation framework, profile mangement, password change, user profile picture management then download my open -source project Adminplus at githhub
download Zip file extract and save it to htdocs folder , if using Linux set permission . open phpmyadmin and create a database sanjay_plus now import  sql . Now we can login using username sanjay password openplus.in.