
If you ever used Kate Editor and love it then next step is to use your next project in Kate . Creating a project or a adding in Kate is not an easy task and you barely get a tutorial that solve you problem unless you go through Kate Application Book. In this tutorial I am going to tell you steps to add a project in Kate and I will provide working screen shot of it.
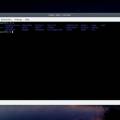
Folder Structure Screen shot Kate Project :

Suppose we have project called folder named “School WordPress template”, inside this folder, we have our main project folder called “School_Wordpress_template” that have all files and folder. So we have to create file named “.kateproject” file inside “School WordPress template” folder with code given below.
{
  "name": "Wordpress_Education_Theme"
, "files": [ { "directory": "Wordpress-Education-theme", "filters": ["*.php", "*.css","*.js"], "recursive": 1 } ]
}
Now open file .kateproject using kate and go to project, you will able to see project files and folder. see the out put below ….

Note:
If you want to create .kateproject inside project folder then use code given below
{ "name": "Wordpress_Education_Theme" , "files": [ { "directory": "./", "filters": ["*.php", "*.css","*.js"], "recursive": 1 } ] }
Related Posts:
 Best Text Editor / IDE on Ubuntu, Linux Mint
 Most used basic Git commands in Programmer’s Life
 Installing Xampp and Laravel on Linux (Ubuntu , mint , OpenSuse …)
 PHP Introduction and Environment Setup
 Linux command line tutorial for Beginners
 Installing Lampp on Rosa Linux using Shell Script
 Admin Plus Free Login System with PHP, MySQL and Foundation
 How to install latest Firefox Developer Edition on Linux
 How to clear Whmcs template cache
 Solve WordPress FTP Error while Installing plugins on Linux

I’ve been looking for this for long. Lots of complicated instructions here and there and then is you… one file, a line of characters and BANG! LOL … Thank you so much!
I have very happy that you get some help from this post